Nuffnang

Saturday, March 21, 2015

How To Patch and Protect OpenSSL Vulnerability # CVE-2015-0291 CVE-2015-0204

A serious security problem has been found and patched in the OpenSSL Library. Multiple vulnerabilities have been discovered in OpenSSL on 19/March/2015. The Common Vulnerabilities and exposures project identifies the following issues:

  1. OpenSSL 1.0.2 ClientHello sigalgs DoS (CVE-2015-0291) - Severity: High
  2. Reclassified: RSA silently downgrades to EXPORT_RSA [Client] (CVE-2015-0204) - Severity: High
  3. Multiblock corrupted pointer (CVE-2015-0290) - Severity: Moderate
  4. Segmentation fault in DTLSv1_listen (CVE-2015-0207) - Severity: Moderate
  5. Segmentation fault in ASN1_TYPE_cmp (CVE-2015-0286) - Severity: Moderate
  6. Segmentation fault for invalid PSS parameters (CVE-2015-0208) - Severity: Moderate
  7. ASN.1 structure reuse memory corruption (CVE-2015-0287) - Severity: Moderate
  8. PKCS7 NULL pointer dereferences (CVE-2015-0289) - Severity: Moderate
  9. Base64 decode (CVE-2015-0292) - Severity: Moderate
  10. DoS via reachable assert in SSLv2 servers (CVE-2015-0293) - Severity: Moderate
  11. Empty CKE with client auth and DHE (CVE-2015-1787) - Severity: Moderate
  12. Handshake with unseeded PRNG (CVE-2015-0285) - Severity: Low
  13. Use After Free following d2i_ECPrivatekey error (CVE-2015-0209) Severity: Low
  14. X509_to_X509_REQ NULL pointer deref (CVE-2015-0288) Severity: Low

How bad will this actually be?

It is not bad as the heartbleed openssl bug disclosed in April 2014 in the OpenSSL cryptography library. But, new bug can cause "Denial of Service" and crash your services. It is good security practice, to quickly apply the patched version on your system and restart the affected services.

How to find openssl version on a Linux?

The syntax is as follows:

Find openssl version on a CentOS/RHEL/SL/Fedora Linux

openssl version
## or ##
sudo yum list installed openssl
 
Sample outputs:
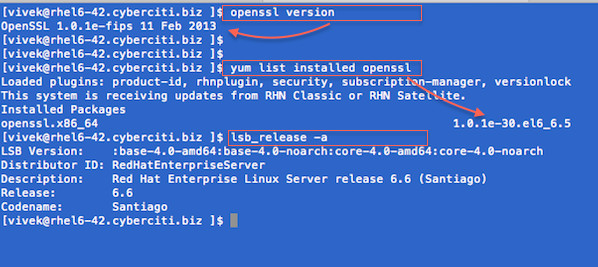
Fig.01: How to RHEL/CentOS/Fedora Linux Find OpenSSL Version Command


A list of affected Linux distros

I recommend that you upgrade your openssl packages ASAP to avoid any security issues on both client and server systems powered by Linux based distro.
  • RHEL version 6.x
  • RHEL version 7.x
  • CentoS Linux version 6.x
  • CentoS Linux version 7.x
  • Debian Linux stable (wheezy) 7.x
  • Ubuntu Linux 14.10
  • Ubuntu Linux 14.04 LTS
  • Ubuntu Linux 12.04 LTS
  • Ubuntu Linux 10.04 LTS

How to patch on a Linux?

Type the following commands as per your distro version/type:
## how do I find out my distro version? ##
lsb_release -a
## or use ## 
cat /etc/*-release
Sample outputs:
Gif 01: HowTo: Find Out My Linux Distribution Name and Version

CentOS/RHEL/Fedora Linux

Type the following yum command to patch openssl as root user to patch openssl:
sudo yum clean all
To install the updates, use the yum command as follows:
sudo yum update
To only update the OpenSSL package and its dependencies, use the following yum command:
sudo yum update openssl

Debian/Ubuntu Linux

Type the following apt-get commands to patch openssl as root user to patch openssl:
sudo apt-get update
sudo apt-get upgrade
Sample outputs:
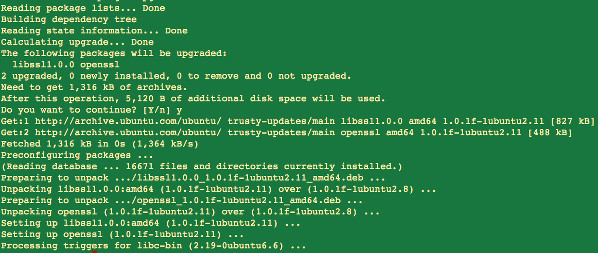
Fig.04: OpenSSL patched on a Ubuntu Linux

Do I need to reboot my server/laptop/computer powered by Linux?

Short answer - yes, you need to reboot your computer/server to make all the necessary changes. Sysadmin should plan on updating as soon as possible or use maintenance reboot window:
sudo reboot
Long answer - It depends. You can avoid reboot by restarting required services. Fist, find all services that depend on the OpenSSL libraries, and restart them one-by-one using the service command:
### Debian/Ubuntu find out if service needed reboot ##
checkrestart -v
 
## Generic method ##
lsof | grep libssl | awk '{print $1}' | sort | uniq
 
Sample outputs:
hhvm
mysqld
nginx
php5-fpm
Restart the above services one-by-one, run:
sudo service restart hhvm restart
sudo service restart mysqld restart
sudo service restart nginx restart
sudo service restart php5-fpm restart

Thursday, March 12, 2015

SRX 100, 110, 210 H2 models are unable to directly upgrade to Junos 12.3X48 release

SRX100H2, SRX110H2-VA, SRX110H2-VB, SRX210HE2, SRX210HE2-POE, SRX220H2, SRX220H2-POE running with Junos OS :
  • 12.1X44-D10/D15/D20/D30/D35
  • 12.1X45-D10/D15/D20/D25
  • 12.1X46-D10/D15/D20
Alert Description:

On SRX100, SRX110, SRX2210, SRX220 devices with H2 model numbers, an upgrade to 12.3X48 will fail when attempting to upgrade from the following releases:
  • Junos 12.1X44-D10 - Junos 12.1X44-D35
  • Junos 12.1X45-D10 - Junos 12.1X45-D25
  • Junos 12.1X46-D10 - Junos 12.1X46-D20

The models affected by this are SRX-Branch100, 210 and 220 models that have 2GB flash with the following model numbers.
  • SRX100H2
  • SRX110H2-VA, SRX110H2-VB
  • SRX210HE2, SRX210HE2-POE
  • SRX220H2, SRX220H2-POE
The error message indicating the issue when attempting the upgrade is shown in the following example:

root@srx210HE2> request system software add /var/tmp/junos-srxsme-12.3X48-D10-domestic.tgz
WARNING: Package 12.3X48-D10 is not compatible with this hardware.
WARNING: Please install an SRX image supported for 2G

This issue is tracked via PR 987067.
Solution:

There are two possible solutions available to work around this issue:

Solution 1) Use release 12.1X44-D40, 12.1X45-D30, 12.1X46-D25, 12.1X47-D10 or later releases as an interim release.

To use this solution, follow these steps:
  1. Install one of the above interim releases
  2. Reboot
  3. Install 12.3X48 release
Note: You may use regular means of installing the Junos software, e.g. the cli command request system software add or J-web or NSM/Space management platforms for this process.


Solution 2) Upgrade directly from an affected release to 12.3X48-D10 and above using a special script.

To use this solution perform the below steps:
  1. Download install script

  2. Place install script on SRX

  3. Open shell prompt and move to directory where install script was placed
  4. root@srx210HE2>start shell
    root@srx210HE2%cd /var/tmp

  5. Optionally verify integrity of install script placed on SRX
  6. root@srx210HE2%md5 package.tar.gz
    MD5 (package.tar.gz) = 29d1bb47845647aae1cec6b69fc6fb44

  7. Un-compress script
  8. root@srx210HE2% tar zxf package.tar.gz    (A new folder will be created called package)

  9. Change directory to new folder labeled package
  10. root@srx210HE2% cd package

  11. Install script
  12. root@srx210HE2% sh ./manifest.loader
    Verified manifest signed by PackageDevelopment_9_6_0

  13. Install 12.3X48 using install script, using optional -no-copy, -no-validate, -reboot commands
  14.      NOTE: This step cannot be done using normal CLI 'request system software upgrade' commands.
                    If using -reboot option, for automatic device reboot after upgrade, skip Steps 9 & 10

    root@srx210HE2%./package <–no-copy> <–no-validate> <–reboot> add <image location/name>
    Example: root@srx210HE2%./package -no-copy add /var/tmp/junos-srxsme-12.3X48-D10-domestic.tgz

  15. Exit Shell
  16. root@srx210HE2%exit
    root@srx210HE2>

  17. Reboot system at your convenience
  18. root@srx210HE2>request system reboot
    Reboot the system ? [yes,no] (no) yes
    Shutdown NOW!

  19. Verify upgrade version post reboot
  20. root@srx> show version
    Hostname: srx
    Model: srx210he2
    JUNOS Software Release [12.3X48-D10]

Sunday, March 1, 2015

DDoS (Distributed Denial of Service) Protection - RHEL 7


Netfilter: iptables target SYNPROXY
DDoS attacks are increasingly becoming commonplace as more and more products and services become dependent
on delivering services over the Internet.
SYNPROXY module is designed to protect against common SYN-­floods and ACK-­floods, but can also be adjusted to
protect against SYN-­ACK floods.
Works by filtering out false SYN-­ACK and ACK packets before the socket enters the “listen” state lock (otherwise
preventing new incoming connections)
Significant step for fighting DDoS and protecting critical system services.
Example configuration (intended for a web server):
sysctl: net.netfilter.nf_conntrack_tcp_loose=0 [DEFAULT=1]
# iptables -­t raw -­A PREROUTING -­i eth0 -­p tcp -­-­dport 80 -­-­syn -­j NOTRACK
# iptables -­A INPUT -­i eth0 -­p tcp -­-­dport 80 -­m state UNTRACKED,INVALID \
-­j SYNPROXY -­-­sack-­perm -­-­timestamp -­-­mss 1480 -­-­wscale 7 –ecn
DDoS