Nuffnang

Monday, December 22, 2014

Network Time Protocol Vulnerabilities

OVERVIEW

Google Security Team researchers Neel Mehta and Stephen Roettger have coordinated multiple vulnerabilities with CERT/CC concerning the Network Time Protocol (NTP). As NTP is widely used within operational Industrial Control Systems deployments, NCCIC/ICS-CERT is providing this information for US Critical Infrastructure asset owners and operators for awareness and to identify mitigations for affected devices. ICS-CERT may release updates as additional information becomes available.
These vulnerabilities could be exploited remotely. Exploits that target these vulnerabilities are publicly available.
Products using NTP service prior to NTP-4.2.8 are affected. No specific vendor is specified because this is an open source protocol.

IMPACT

Exploitation of these vulnerabilities could allow an attacker to execute arbitrary code with the privileges of the ntpd process.

Impact to individual organizations depends on many factors that are unique to each organization. ICS-CERT recommends that organizations evaluate the impact of this vulnerability based on their operational environment, architecture, and product implementation.

BACKGROUND

The NTP is described in RFC 958a, an open source collaboration for acceptance and is used to synchronize system time over a network.

VULNERABILITY CHARACTERIZATION

VULNERABILITY OVERVIEW

INSUFFICIENT ENTROPYb

If the authentication key is not set in the configuration file, ntpd will generate a weak random key with insufficient entropy.

This vulnerability was resolved with NTP-dev4.2.7p11 on January 28, 2010.

CVE-2014-9293c has been assigned by CERT/CC to this vulnerability. A CVSS v2 base score of 7.3 has been assigned by CERT/CC; the CVSS vector string is (AV:N/AC:L/Au:M/C:P/I:P/A:C).d

USE OF CRYPTOGRAPHICALLY WEAK PRNGe

Prior to NTP-4.2.7p230 ntp-keygen used a weak seed to prepare a random number generator. The random numbers produced were then used to generate symmetric keys.
This vulnerability was resolved with NTP-dev4.2.7p230 on November 1, 2010.
CVE-2014-9294f has been assigned by CERT/CC to this vulnerability. A CVSS v2 base score of 7.3 has been assigned; the CVSS vector string is (AV:N/AC:L/Au:M/C:P/I:P/A:C).g

STACK-BASED BUFFER OVERFLOWSh

A remote attacker can send a carefully crafted packet that can overflow a stack buffer and potentially allow malicious code to be executed with the privilege level of the ntpd process. All NTP4 releases before 4.2.8 are vulnerable.
This vulnerability is resolved with NTP-stable4.2.8 on December 19, 2014.
CVE-2014-9295i has been assigned by CERT/CC to this vulnerability. A CVSS v2 base score of 7.3 has been assigned; the CVSS vector string is (AV:N/AC:L/Au:N/C:P/I:P/A:P).j

MISSING RETURN ON ERRORk

In the NTP code, a section of code is missing a return, and the resulting error indicates processing did not stop. This indicated a specific rare error occurred, which does not appear to affect system integrity. All NTP Version 4 releases before Version 4.2.8 are vulnerable.
This vulnerability is resolved with NTP-stable4.2.8 on December 19, 2014.
CVE-2014-9296l has been assigned by CERT/CC to this vulnerability. A CVSS v2 base score of 5.0 has been assigned; the CVSS vector string is (AV:N/AC:L/Au:N/C:N/I:N/A:P).m

VULNERABILITY DETAILS

EXPLOITABILITY

These vulnerabilities could be exploited remotely.

EXISTENCE OF EXPLOIT

Exploits that target these vulnerabilities are publicly available.

DIFFICULTY

An attacker with a low skill would be able to exploit these vulnerabilities.

MITIGATION

All NTP Version 4 releases, prior to Version 4.2.8, are vulnerable and need to be updated to Version 4.2.8.
ICS-CERT strongly encourages CIKR users to backup current operational ICS configurations, and thoroughly test the updated software for system compatibility on a test system before attempting deployment on operational systems.
CERT/CC has published a Vulnerability Note at the following URL:
http://www.kb.cert.org/vuls/id/852879
The latest NTP releases can be accessed at:
http://support.ntp.org/bin/view/Main/SoftwareDownloads.
ICS-CERT would like to thank NTP for coordinating with the Google Security Team Researchers.
ICS-CERT also encourages asset owners to take additional defensive measures to protect against this and other cybersecurity risks.
  • Minimize network exposure for all control system devices and/or systems, and ensure that they are not accessible from the Internet.
  • Locate control system networks and remote devices behind firewalls, and isolate them from the business network.
  • When remote access is required, use secure methods, such as Virtual Private Networks (VPNs), recognizing that VPNs may have vulnerabilities and should be updated to the most current version available. Also recognize that VPN is only as secure as the connected devices.

Wednesday, December 10, 2014

vCenter Server Appliance 5.5 vs vCenter Server 5.5

vCenter Server Appliance 5.5 vs vCenter Server 5.5 on Windows

vCenter Server Appliance 5.5 is reducing the dependency of Windows operating system for vCenter server Install. With VCSA 5.5 on Embedded database can manage 100 hosts and 3000 Virtual Machines. vCSA reduces lot of administrative efforts by reducing efforts needed for windows patching, software update and management of Guest OS on windows operating system. It is necessary to understand the difference between the vCenter Server Appliance 5.5 and vCenter server 5.5 installed on windows Server. This post will explain you the detailed difference between the 2 items.


Feature
vCenter Server Appliance 5.5
vCenter Server 5.5 on Windows
Can be Deployed 
 Only as a Virtual Machine
Can be installed on Physical or
Virtual windows Machine
Operating System
Preconfigured Linux-based
virtual machine
vCenter 5.5 requires 64 Bit OS and 64 bit DSN:
Windows Server 2012 (64 bit)
Windows Server 2008 Sp2 (64 bit)
Windows Server 2008 R2 Sp1 (64 bit)
Windows Server 2008 R2 (64 bit)
Database
PostgreSQL for the embedded database
Supports Oracle Database
SQL Server 2005 (SP4) (Standard\Enterprise)
(32-bit & 64-bit)
SQL Server 2008 (R2 SP2, R2 SP1) (Express\standard\Enterprise\Datacenter) (32-bit & 64-bit) SQL Server 2012 (SP1) (Enterprise\Standard) (32-bit & 64-bit)
Oracle 11 G Release 2 (Enterprise\Standard) & Oracle 11G ONE edition (32-bit & 64-bit)
Installation Method
 Deployed as a Virtual Machine using OVF or
OVA template
Need to install on top of Windows Operating System.
Hosts Per vCenter
100 Hosts with
embedded vPostgres database
1000 Hosts with Oracle Database
1000 hosts per vCenter Server
Virtual Machines Per vCenter
3,000 VM’s with
embedded vPostgres database
10,000 VM’s with Oracle Database
10,000 VM’s per vCenter Server
vCenter Linked Mode
Not Supported
Supported with Windows Install
vCenter Server Heartbeat
Not Supported
vCenter heartbeat is a windows application.
It works with Windows install vCenter server
VMware Update Manager
You can’t install VUM on VCSA. Update Manager can be installed on separate windows machine to use with VCSA
Supported with Windows Install
AutoDeploy
Autodeploy is bundled with VCSA
Should be installed as an additional package. Installation files are located in vCenter Installation DVD
Syslog Collector
Syslog collector is installed by default
Should be installed as an additional package. Installation files are located in vCenter Installation DVD
ESXi Dump Collector Service
ESXi Dump Collector Service is installed by default
Should be installed as an additional package. Installation files are located in vCenter Installation DVD
vSphere Web Client
Pre-Installed with VCSA
Should be installed as an additional package. Installation files are located in vCenter Installation DVD
PowerCLI
Cannot be installed on vCSA
Can be installed on Windows vCenter Server machine
IPV6 support
IPv6 is not supported. Only supports IPV4
Both  IPv4 and IPv6 are supported

Saturday, December 6, 2014

Release for CentOS Linux Rolling media

CentOS Linux rolling builds are point in time snapshot media rebuild
from original release time, to include all updates pushed to
mirror.centos.org's repositories. This includes all security, bugfix,
enhancement and general updates for CentOS Linux. Machines installed
from this media will have all these updates pre-included and will look
no different when compared with machines installed with older media
that have been yum updated to the same point in time. All rpm/yum
repos remain on mirror.centos.org with no changes in either layout or
content. 


We will aim to update and issue for release a new set of these files
at the end of every month going forward. Each released filename
includes a datestamp and a buildtag to indicate the content included.
Files marked as 20141129_02 indicate that it includes all content
released to mirror.centos.org upto ( and including ) the 29th of Nov
2014 and is the second build of that cycle. While all build's are made
public at buildlogs.centos.org/, only those that pass our QA and
testing cycles will be marked as released, to be included in
buildlogs.centos.org/rolling/. We will also do interim builds as
needed ( for development and testing purposes ) at different points in
time, those builds will not be marked for general release, but will
still be avilable publicly.

Since there is a need to test these images, the release will always
lag few days behind the datestamp ( and therefore content included )
in the release. My aim is to automate as much of this as possible
going forward to reduce this time lag as much as possible, however we
might not be able to remove it completely.

With every cycle, we hope to increase the content made available in
this rolling format. Immediate next steps include bringing the CentOS
Linux 7 livemedia into the rolling releases followed by CentOS Linux 6
content from the next ( December 2014 ) cycle.

Due to the way the installer works in CentOS-5, and its point in time
we have no plans on including CentOS-5 in this cycle at this point.

For the sake of uniformity and communication, the release media will
be referenced by the month it reflects, not the month it was released
in. Making this release the Nov 2014 Rolling release.

Other content formats like containers and vendor specific images will
aim to start with the same cycle as the main CentOS Linux media, but
might move to a more frequent build and release cycle if needed.
Special Interest Groups ( http://wiki.centos.org/SpecialInterestGroup
) wanting to do media and installer releases should also consider
using the rolling timelines to sync with.
 
CentOS Linux distro installer media:

File: CentOS-7-x86_64-DVD-20141129_02.iso
Sha256sum:
85a46c62b5bfc701678bef7854bb73af4ccfb840dfcbfb2f9b2189e08fe9438c

File: CentOS-7-x86_64-Everything-20141129_02.iso
Sha256sum:
f9fdd8b12c9529a1e3bf7628ebee964b2aeb9fd66540de7b369e0fde6f7a4236

File: CentOS-7-x86_64-Minimal-20141129_02.iso
Sha256sum:
e1338d13178f1c66c17386b7ced0b1459c677ff9a1cf095ac4db377234cc03fa

Symlinks are provided that will always map to the latest released
builds, as follows ( including their current mapping )
http://buildlogs.centos.org/rolling/7/isos/x86_64/CentOS-7-x86_64-DVD.iso
- -> CentOS-7-x86_64-DVD-20141129_02.iso
http://buildlogs.centos.org/rolling/7/isos/x86_64/CentOS-7-x86_64-Everything.iso
- -> CentOS-7-x86_64-Everything-20141129_02.iso
http://buildlogs.centos.org/rolling/7/isos/x86_64/CentOS-7-x86_64-Minimal.iso
- -> CentOS-7-x86_64-Minimal-20141129_02.iso

These symlinks will be updated to point at the latest tested and
released media and make for a good target in automation that requires
CentOS Linux media.
 
Cloud and Instance Images:

The CentOS Linux 7 GenericCloud image is built to include cloud-init
from the Extras/ repository. The image is made available in multiple
formats, with identical content. The cloud images are released via
http://cloud.centos.org/centos/7/images/

File: CentOS-7-x86_64-GenericCloud-20141129_01.qcow2
Desc: is the reference image.
Size: 944 MB
Sha256Sum:
7710ffdd497cf00fc72c22a3fa7cc7adb3424d3542521ca8fbe19eba9ded403f

File: CentOS-7-x86_64-GenericCloud-20141129_01.qcow2c
Desc: This is the same image, run through the qemu qcow2 internal
compression setup - while this image is suiteable for development and
play, it comes with non trivial i/o performance penalties and
therefore not recommended for production.
Size: 399MB
Sha256Sum:
db42e4fb9565e75f0acbe6b54a5b8822f3f1e9783fb1a553e1552c72ceaff8df

File: CentOS-7-x86_64-GenericCloud-20141129_01.qcow2.xz
Desc:  This is the regular qcow2 file, run through the xz compression
tool. This gives a regular qcow2 file, suiteable for production use.
Size: 266MB
Sha256Sum:
9b0b38c48a24164c15c33625972b87835501b6994c3ee894f6b79ce40e7d5e54

File: CentOS-7-x86_64-GenericCloud-20141129_01.raw
Desc: This is a raw format file for systems that dont consume qcow2
image types. Its also suiteable to use with "qemu-img convert" to
render into different formats.
Size: 8GB.
Sha256Sum:
2e643310bdb3cda775905408dbfe378a5eed04e91db193165178afc5ed5492b8


Symlinks are provided that will always map to the latest released
builds, as follows ( including their current mapping )
http://cloud.centos.org/centos/7/images/CentOS-7-x86_64-GenericCloud.qcow2
- -> CentOS-7-x86_64-GenericCloud-20141129_01.qcow2
http://cloud.centos.org/centos/7/images/CentOS-7-x86_64-GenericCloud.qcow2c
- -> CentOS-7-x86_64-GenericCloud-20141129_01.qcow2c
http://cloud.centos.org/centos/7/images/CentOS-7-x86_64-GenericCloud.qcow2.xz
- -> CentOS-7-x86_64-GenericCloud-20141129_01.qcow2.xz
http://cloud.centos.org/centos/7/images/CentOS-7-x86_64-GenericCloud.raw
- -> CentOS-7-x86_64-GenericCloud-20141129_01.raw

These symlinks will be updated to point at the latest tested and
released media and make for a good target in automation that requires
CentOS Linux media.
 

Monday, December 1, 2014

Leader


As a leader, you hold a great responsibility. You are the architect of the plan that will take your people to a better place, not just in terms of the achievement of common goals, but also in terms of the fulfillment of their basic, as well as their more complex needs as human beings.
Regardless of whether you lead a small or a large organization, for-profit or non-for-profit, a religious community or a sports club, as a leader you are ultimately responsible for certain decisions affecting other people´s lives.
People do not mess around with their livelihoods, therefore human beings only follow those who care about their needs.
Your ability to visualize joint goals, alongside your capacity to satisfy common human needs, becomes instrumental for good leadership.
But while leading people in general is always a difficult task, leading leaders is certainly a much more complex challenge.
The complexity in leading leaders resides in the fact that the needs of those who have already reached a leadership role are not necessarily related to the basic needs of the "general public", such as financial stability, protection against unexpected adversities and sense of belonging.
People holding leadership roles expect those above them to understand their "more complex" needs. Leader's needs have more to do with status, contribution and self-actualization, than with mere monetary compensation per se.
We all have seen examples of organizations promoting super-achievers at mid management level, to senior leadership roles.
The problem with this type of policy is that in most cases the super-achiever does not understand what it takes to manage other leaders effectively.
Super-achievers tend to struggle when promoted to C-level roles due to a variety of reasons, including:
  • Selfishness.
  • Inability to delegate.
  • Incapability to empathize.
  • Result-centeredness.
Working at C-level is radically different to managing a team of doers or being a super-star.
As a senior leader you will need to gain the aid and support of other leaders in order to be able to materialize common strategic goals. Otherwise you take the risk of being sabotaged very quickly.
In this article, I will recap on what attitudes and behaviors you must nurture in order to be able to lead a team of leaders.
# 1. Empower Your Team:
Once you are in a C-level role, you should no longer tell your people what to do or how to do it. You are leading leaders, so they know perfectly well the what´s and how´s.
Telling other leaders what to do or how to do it is a clear sign of your lack of confidence in their ability to lead their teams.
People in leadership roles like to feel empowered. They need to feel that those above them have full confidence in their ability to make the most out of the resources avilable to them.
# 2. Be Humble:
Ask your team about their opinion and incentivize open debate. Don´t impose your thoughts. Promote discussion and challenge status quo, so you give other leaders the opportunity to express their ideas too.
Humble leaders understand and apply a balance of being strong, yet gentle. They are opened to constructive criticism and innovative ideas.
Other leaders need to feel that their opinion matters and most importantly, that they are no longer compensated for what they “do”, but for their strategic contributions.
# 3. Be Coherent:
Your behavior will be permanently under scrutiny. Other leaders will incessantly judge your actions as most likely their ultimate goal is occupy your chair and that´s fine, succession plans are a key part of every organizational strategy.
It is critical that your actions are consistent with your words. Never ask other leaders to do what you cannot or you would not do yourself.
Don´t abuse your position of authority and always apply a rational judgment behind all your actions.
# 4. Be Generous:
If you are in a C-level role, make sure you share the spotlight with other leaders who may benefit from additional visibility and exposure. Give them the opportunity to shine when the right occasion arises.
Self-actualized individuals are concerned with solving problems, including helping others and finding solutions to problems in the external world. These people are often motivated by a sense of personal responsibility and ethics.
Admirable leaders come across as very personable and generous human beings; they express their self-confidence through inclusiveness and generosity.
If you don´t allow other leaders to exploit their intellectual talent and reward them for their contributions, you may soon see them break away.
Self-actualization, creativity and status are all key motivational drivers for people in leading roles. As a leader of leaders your primary responsability is to fulfill those needs.
Remember that you do not need to be the one calling all the shots anymore, that´s why you lead a team of leaders now!

Thursday, November 13, 2014

Hardware discontinuation / immediate End of Life SRX210H-P-MGW, SRX220H-P-MGW, SRX240H-P-MGW, SRX-MP-VA04, SRX-MP-VA04, SRX-MP-VA22

Product Affected:
 
SRX210H-P-MGW, SRX220H-P-MGW, SRX240H-P-MGW, SRX-MP-VA04, SRX-MP-VA04, SRX-MP-VA22
 
Alert Description:

 
The Integrated Convergence Services (ICS) solution consisting of the Branch SRX Media Gateway products SRX210H-P-MGW, SRX220H-P-MGW SRX240H-P-MGW, SRX-MP-VA04, SRX-MP-VA04, SRX-MP-VA22 is being discontinued immediately, and removed as a supported product. These products were in early access, but not launched. Juniper Networks will be contacting customers with these products in order to replace them with similar SRX products that do not contain the ICS and Media Gateway functionality. This will be handled as an "Exchange RMA." Customers are asked to call in and identify their call is in reference to the "SRX Media Gateway Exchange Program".

Once the exchange RMA is taken, the replacement device(s) will be shipped to the customer. The replacement hardware will be registered and the remaining term of the support contract will be transferred to the new hardware. Shipping labels will be sent to the customer with the replacement device, one for each device in the exchange to be returned to Juniper. The customer will use the box received from the replacement device to return the SRX-MGW device(s).

Update 11/12/14:

All products listed above have reached EOL and no further exchanges or RMA's will be fulfilled.

Tuesday, November 4, 2014

Enable EPEL repository in CentOS & RHEL

EPEL stands for ‘Extra Packages for Enterprise Linux‘ , as the name suggest epel provides additional rpm packages for RHEL , CentOS , Scientific Linux (SL) & Oracle Enterprise Linux (OLE) . EPEL is created and maintained by Fedora community and EPEL packages are 100% free/libre open source software (FLOSS).
In this post we will discuss how to enable epel repository in CentOS / RHEL 5.X / 6.X / 7.X

For CentOS 5.X / RHEL 5.X

Open the terminal & become the root user and execute below command :
For 32 bit OS
# rpm -Uvh http://download.fedoraproject.org/pub/epel/5/i386/epel-release-5-4.noarch.rpm
For 64 bit OS
# rpm -Uvh http://download.fedoraproject.org/pub/epel/5/x86_64/epel-release-5-4.noarch.rpm

For CentOS 6.X / RHEL 6.X

Open the terminal execute below command as a root user.
For 32 bit OS
# rpm -Uvh http://download.fedoraproject.org/pub/epel/6/i386/epel-release-6-8.noarch.rpm
For 64 bit OS
# rpm -Uvh http://download.fedoraproject.org/pub/epel/6/x86_64/epel-release-6-8.noarch.rpm

For CentOS 7.X / RHEL 7.X

Open the terminal execute below command as a root user
For 64 bit OS
# rpm -Uvh http://download.fedoraproject.org/pub/epel/7/x86_64/e/epel-release-7-2.noarch.rpm
Note : EPEL repository file is located under ‘/etc/yum.repos.d/epel.repo’

List New Repository

[root@localhost ~]# yum repolist 
Loaded plugins: fastestmirror, langpacks
Loading mirror speeds from cached hostfile
 * base: mirror.nbrc.ac.in
 * epel: ftp.jaist.ac.jp
 * extras: mirror.nbrc.ac.in
 * updates: mirror.nbrc.ac.in
repo id            repo name                                                 status
base/7/x86_64      CentOS-7 - Base                                           8,465
epel/x86_64        Extra Packages for Enterprise Linux 7 - x86_64            6,349
extras/7/x86_64    CentOS-7 - Extras                                         75
updates/7/x86_64   CentOS-7 - Updates                                        1,127
repolist: 16,016

List EPEL Packages :

[root@localhost ~]# yum --disablerepo="*" --enablerepo="epel" list available

Thursday, October 16, 2014

Smartmontools

Installing Smartmontools

Installation of smartmontools is straightforward as it available in base repositories of most Linux distros.

Red Hat-based distributions:

# yum install smartmontools

Checking Hard Drive Health with Smartctl

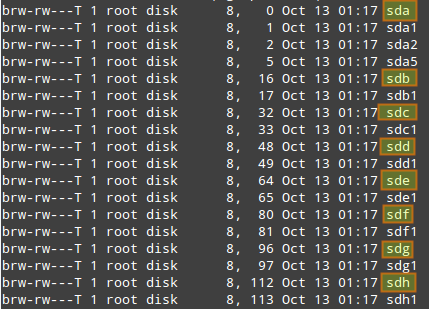
First off, list the hard drives connected to your system with the following command:
# ls -l /dev | grep -E 'sd|hd'
The output should be similar to:

where sdx indicate device names assigned to the hard drives installed on your machine.
To display information about a particular hard disk (e.g., device model, S/N, firmware version, size, ATA version/revision, availability and status of SMART capability), run smartctl with "--info" flag, and specify the hard drive's device name as follows.
In this example, we will choose /dev/sda.
# smartctl --info /dev/sda

Although the ATA version information may seem to go unnoticed at first, it is one of the most important factors when looking for a replacement part. Each ATA version is backward compatible with the previous versions. For example, older ATA-1 or ATA-2 devices work fine on ATA-6 and ATA-7 interfaces, but unfortunately, that is not true for the other way around. In cases where the device version and interface version don't match, they work together at the capabilities of the lesser of the two. That being said, an ATA-7 hard drive is the safest choice for a replacement part in this case.
You can examine the health status of a particular hard drive with:
# smartctl -s on -a /dev/sda
In this command, "-s on" flag enables SMART on the specified device. You can ommit it if SMART support is already enabled for /dev/sda.
The SMART information for a disk consists of several sections. Among other things, "READ SMART DATA" section shows the overall health status of the drive.
=== START OF READ SMART DATA SECTION ===
SMART overall-health self-assessment rest result: PASSED
The result of this test can be either PASSED or FAILED. In the latter case, a hardware failure is imminent, so you may want to start backing up your important data from that drive!
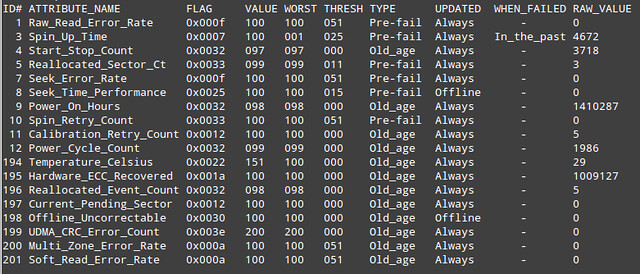
The next thing you will want to look at is the SMART attribute table, as shown below.

Basically, SMART attribute table lists values of a number of attributes defined for a particular drive by its manufacturer, as well as failure threshold for these attributes. This table is automatically populated and updated by drive firmware.
  • ID#: attribute ID, usually a decimal (or hex) number between 1 and 255.
  • ATTRIBUTE_NAME: attribute names defined by a drive manufacturer.
  • FLAG: attribute handling flag (we can ignore it).
  • VALUE: this is one of the most important information in the table, indicating a "normalized" value of a given attribute, whose range is between 1 and 253. 253 means the best condition, while 1 means the worse condition. Depending on attributes and manufacturers, an initial VALUE can be set to either 100 or 200.
  • WORST: the lowest VALUE ever recorded.
  • THRESH: the lowest value that WORST should ever be allowed to fall to, before reporting a given hard drive as FAILED.
  • TYPE: the type of attribute (either Pre-fail or Old_age). A Pre-fail attribute is considered a critical attribute; one that participates in the overall SMART health assessment (PASSED/FAILED) of the drive. If any Pre-fail attribute fails, then the drive is considered "about to fail." On the other hand, an Old_age attribute is considered (for SMART purposes) a non-critical attribute (e.g., normal wear and tear); one that does not fail the drive per se.
  • UPDATED: indicates how often an attribute is updated. Offline represents the case when offline tests are being performed on the drive.
  • WHEN_FAILED: this will be set to "FAILING_NOW" (if VALUE is less than or equal to THRESH), or "In_the_past" (if WORST is less than equal to THRESH), or "-" (if none of the above). In case of "FAILING_NOW", back up your important files ASAP, especially if the attribute is of TYPE Pre-fail. "In_the_past" means that the attribute has failed before, but that it's OK at the time of running the test. "-" indicates that this attribute has never failed.
  • RAW_VALUE: a manufacturer-defined raw value, from which VALUE is derived.
At this point you may be thinking, "Yes, smartctl seems like a nice tool. but I would like to avoid the hassle of having to run it manually." Wouldn't it be nice if it could be run at specified intervals, and at the same time inform me of the testsresults?
Fortunately, the answer is yes. And that's when smartd comes in.

Configuring Smartctl and Smartd for Live Monitoring

First, edit smartctl's configuration file (/etc/default/smartmontools) to tell it to start smartd at system startup, and to specify check intervals in seconds (e.g., 7200 = 2 hours).
start_smartd=yes
smartd_opts="--interval=7200"
Next, edit smartd's configuration file (/etc/smartd.conf) to add the followign line.
/dev/sda -m myemail@mydomain.com -M test
  • -m <email-address>: specifies an email address to send test reports to. This can be a system user such as root, or an email address such as myemail@mydomain.com if the server is configured to relay emails to the outside of your system.
  • -M <delivery-type>: specifies the desired type of delivery for an email report.
    • once: sends only one warning email for each type of disk problem detected.
    • daily: sends additional warning reminder emails, once per day, for each type of disk problem detected.
    • diminishing: sends additional warning reminder emails, after a one-day interval, then a two-day interval, then a four-day interval, and so on for each type of disk problem detected. Each interval is twice as long as the previous interval.
    • test: sends a single test email immediately upon smartd startup.
    • exec PATH: runs the executable PATH instead of the default mail command. PATH must point to an executable binary file or script. This allows to specify a desired action (beep the console, shutdown the system, and so on) when a problem is detected.
Save the changes and restart smartd.

Thursday, October 2, 2014

Red Hat Storage Server 3 : Highlight

  • Increased scale and capacity by more than three times with support for up to 60 drives per server, up from 36, and 128 servers per cluster, up from 64, providing a usable capacity of up to 19 petabytes per cluster.
  • Improved data protection and operational control of storage clusters, including:volume snapshots for point-in-time copy of critical data, and comprehensive monitoring of the storage cluster using open, industry standard frameworks, such as Nagios and SNMP.
  • Easy integration with emerging big data analytics environments with support for a Hadoop File System Plug-In that enables running ApacheTM Hadoop® workloads on the storage server, as well as tight integration with Apache Ambari for management and monitoring of Hadoop and underlying storage.
  • More hardware choice and flexibility, including support for SSD for low latency workloads, and a significantly expanded hardware compatibility list (HCL) for greater choice in hardware platforms.
  • Rapid deployment with RPM-based distribution option offering maximum deployment flexibility to existing Red Hat Enterprise Linux users. Customers can now easily add Red Hat Storage Server to existing pre-installed Red Hat Enterprise Linux deployments.

Wednesday, September 17, 2014

Windows 2012 : Monitoring Work Folders with PowerShell

Monitoring Work Folders with PowerShell

The Work Folders Service on Windows Server 2012 R2 comes with a supporting PowerShell module and cmdlets. (For the full list of Work Folders Cmdlets run gcm –m SyncShare in a Powershell console).
Just like in the examples shown above, where Server Manager was used to monitor and extract the information, the Work Folders cmdlets provide a way to retrieve Work Folders sync shares and users information. This can be either used by administrators for interactive monitoring session or for automation within PowerShell scripts.
Here are a few Powershell examples that provides Work Folders sync shares and users status information.
Get-SyncShare  - The Get-SyncShare cmdlet provides information on sync shares. This includes the file system location, the list of security groups and more.

From these objects, Staging folder and Path can be extracted and checked for availability and overall health.


Get-SyncUserStatus - similar to the users’ property window described above in the server manager section, this cmdlet provides Work Folders users’ information. This includes the user name, the devices that the users are using, last successful connections and more.  Running this cmdlet requires providing the specific user name and sync share.

Here is an example for listing the devices and status that Sally is using with Work Folders:

 In the results shown above, useful user information is shown about the user’s devices, their OS configuration and last successful sync time.

Get-Service - The Sync Share service (named SyncShareSVC ) status can be read by using PowerShell’s generic get-service command

 In the above example we can see that the service is in “Running” state. “Stopped” means that the service is not running.
Events – Powershell also provides an easy way of listing Work Folders events, either the operational or the reporting channels. Here are a few examples:
1) Listing Errors from the operational channel (in this example, the issues are reported on a system where one of the disks hosting the Work Folders directory was intentionally yanked out)

2) List successful events from the Work Folders Reporting channel