Nuffnang

Thursday, November 13, 2014

Hardware discontinuation / immediate End of Life SRX210H-P-MGW, SRX220H-P-MGW, SRX240H-P-MGW, SRX-MP-VA04, SRX-MP-VA04, SRX-MP-VA22

Product Affected:
 
SRX210H-P-MGW, SRX220H-P-MGW, SRX240H-P-MGW, SRX-MP-VA04, SRX-MP-VA04, SRX-MP-VA22
 
Alert Description:

 
The Integrated Convergence Services (ICS) solution consisting of the Branch SRX Media Gateway products SRX210H-P-MGW, SRX220H-P-MGW SRX240H-P-MGW, SRX-MP-VA04, SRX-MP-VA04, SRX-MP-VA22 is being discontinued immediately, and removed as a supported product. These products were in early access, but not launched. Juniper Networks will be contacting customers with these products in order to replace them with similar SRX products that do not contain the ICS and Media Gateway functionality. This will be handled as an "Exchange RMA." Customers are asked to call in and identify their call is in reference to the "SRX Media Gateway Exchange Program".

Once the exchange RMA is taken, the replacement device(s) will be shipped to the customer. The replacement hardware will be registered and the remaining term of the support contract will be transferred to the new hardware. Shipping labels will be sent to the customer with the replacement device, one for each device in the exchange to be returned to Juniper. The customer will use the box received from the replacement device to return the SRX-MGW device(s).

Update 11/12/14:

All products listed above have reached EOL and no further exchanges or RMA's will be fulfilled.

Tuesday, November 4, 2014

Enable EPEL repository in CentOS & RHEL

EPEL stands for ‘Extra Packages for Enterprise Linux‘ , as the name suggest epel provides additional rpm packages for RHEL , CentOS , Scientific Linux (SL) & Oracle Enterprise Linux (OLE) . EPEL is created and maintained by Fedora community and EPEL packages are 100% free/libre open source software (FLOSS).
In this post we will discuss how to enable epel repository in CentOS / RHEL 5.X / 6.X / 7.X

For CentOS 5.X / RHEL 5.X

Open the terminal & become the root user and execute below command :
For 32 bit OS
# rpm -Uvh http://download.fedoraproject.org/pub/epel/5/i386/epel-release-5-4.noarch.rpm
For 64 bit OS
# rpm -Uvh http://download.fedoraproject.org/pub/epel/5/x86_64/epel-release-5-4.noarch.rpm

For CentOS 6.X / RHEL 6.X

Open the terminal execute below command as a root user.
For 32 bit OS
# rpm -Uvh http://download.fedoraproject.org/pub/epel/6/i386/epel-release-6-8.noarch.rpm
For 64 bit OS
# rpm -Uvh http://download.fedoraproject.org/pub/epel/6/x86_64/epel-release-6-8.noarch.rpm

For CentOS 7.X / RHEL 7.X

Open the terminal execute below command as a root user
For 64 bit OS
# rpm -Uvh http://download.fedoraproject.org/pub/epel/7/x86_64/e/epel-release-7-2.noarch.rpm
Note : EPEL repository file is located under ‘/etc/yum.repos.d/epel.repo’

List New Repository

[root@localhost ~]# yum repolist 
Loaded plugins: fastestmirror, langpacks
Loading mirror speeds from cached hostfile
 * base: mirror.nbrc.ac.in
 * epel: ftp.jaist.ac.jp
 * extras: mirror.nbrc.ac.in
 * updates: mirror.nbrc.ac.in
repo id            repo name                                                 status
base/7/x86_64      CentOS-7 - Base                                           8,465
epel/x86_64        Extra Packages for Enterprise Linux 7 - x86_64            6,349
extras/7/x86_64    CentOS-7 - Extras                                         75
updates/7/x86_64   CentOS-7 - Updates                                        1,127
repolist: 16,016

List EPEL Packages :

[root@localhost ~]# yum --disablerepo="*" --enablerepo="epel" list available

Thursday, October 16, 2014

Smartmontools

Installing Smartmontools

Installation of smartmontools is straightforward as it available in base repositories of most Linux distros.

Red Hat-based distributions:

# yum install smartmontools

Checking Hard Drive Health with Smartctl

First off, list the hard drives connected to your system with the following command:
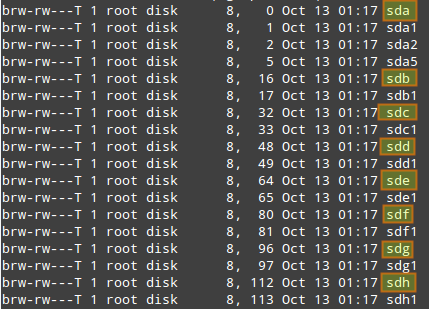
# ls -l /dev | grep -E 'sd|hd'
The output should be similar to:

where sdx indicate device names assigned to the hard drives installed on your machine.
To display information about a particular hard disk (e.g., device model, S/N, firmware version, size, ATA version/revision, availability and status of SMART capability), run smartctl with "--info" flag, and specify the hard drive's device name as follows.
In this example, we will choose /dev/sda.
# smartctl --info /dev/sda

Although the ATA version information may seem to go unnoticed at first, it is one of the most important factors when looking for a replacement part. Each ATA version is backward compatible with the previous versions. For example, older ATA-1 or ATA-2 devices work fine on ATA-6 and ATA-7 interfaces, but unfortunately, that is not true for the other way around. In cases where the device version and interface version don't match, they work together at the capabilities of the lesser of the two. That being said, an ATA-7 hard drive is the safest choice for a replacement part in this case.
You can examine the health status of a particular hard drive with:
# smartctl -s on -a /dev/sda
In this command, "-s on" flag enables SMART on the specified device. You can ommit it if SMART support is already enabled for /dev/sda.
The SMART information for a disk consists of several sections. Among other things, "READ SMART DATA" section shows the overall health status of the drive.
=== START OF READ SMART DATA SECTION ===
SMART overall-health self-assessment rest result: PASSED
The result of this test can be either PASSED or FAILED. In the latter case, a hardware failure is imminent, so you may want to start backing up your important data from that drive!
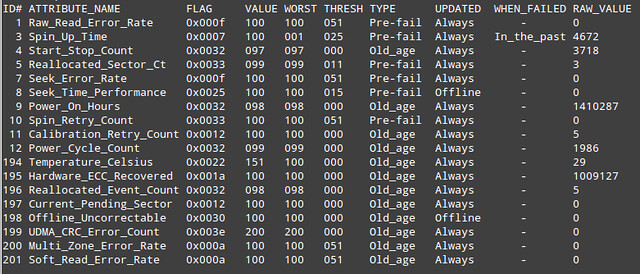
The next thing you will want to look at is the SMART attribute table, as shown below.

Basically, SMART attribute table lists values of a number of attributes defined for a particular drive by its manufacturer, as well as failure threshold for these attributes. This table is automatically populated and updated by drive firmware.
  • ID#: attribute ID, usually a decimal (or hex) number between 1 and 255.
  • ATTRIBUTE_NAME: attribute names defined by a drive manufacturer.
  • FLAG: attribute handling flag (we can ignore it).
  • VALUE: this is one of the most important information in the table, indicating a "normalized" value of a given attribute, whose range is between 1 and 253. 253 means the best condition, while 1 means the worse condition. Depending on attributes and manufacturers, an initial VALUE can be set to either 100 or 200.
  • WORST: the lowest VALUE ever recorded.
  • THRESH: the lowest value that WORST should ever be allowed to fall to, before reporting a given hard drive as FAILED.
  • TYPE: the type of attribute (either Pre-fail or Old_age). A Pre-fail attribute is considered a critical attribute; one that participates in the overall SMART health assessment (PASSED/FAILED) of the drive. If any Pre-fail attribute fails, then the drive is considered "about to fail." On the other hand, an Old_age attribute is considered (for SMART purposes) a non-critical attribute (e.g., normal wear and tear); one that does not fail the drive per se.
  • UPDATED: indicates how often an attribute is updated. Offline represents the case when offline tests are being performed on the drive.
  • WHEN_FAILED: this will be set to "FAILING_NOW" (if VALUE is less than or equal to THRESH), or "In_the_past" (if WORST is less than equal to THRESH), or "-" (if none of the above). In case of "FAILING_NOW", back up your important files ASAP, especially if the attribute is of TYPE Pre-fail. "In_the_past" means that the attribute has failed before, but that it's OK at the time of running the test. "-" indicates that this attribute has never failed.
  • RAW_VALUE: a manufacturer-defined raw value, from which VALUE is derived.
At this point you may be thinking, "Yes, smartctl seems like a nice tool. but I would like to avoid the hassle of having to run it manually." Wouldn't it be nice if it could be run at specified intervals, and at the same time inform me of the testsresults?
Fortunately, the answer is yes. And that's when smartd comes in.

Configuring Smartctl and Smartd for Live Monitoring

First, edit smartctl's configuration file (/etc/default/smartmontools) to tell it to start smartd at system startup, and to specify check intervals in seconds (e.g., 7200 = 2 hours).
start_smartd=yes
smartd_opts="--interval=7200"
Next, edit smartd's configuration file (/etc/smartd.conf) to add the followign line.
/dev/sda -m myemail@mydomain.com -M test
  • -m <email-address>: specifies an email address to send test reports to. This can be a system user such as root, or an email address such as myemail@mydomain.com if the server is configured to relay emails to the outside of your system.
  • -M <delivery-type>: specifies the desired type of delivery for an email report.
    • once: sends only one warning email for each type of disk problem detected.
    • daily: sends additional warning reminder emails, once per day, for each type of disk problem detected.
    • diminishing: sends additional warning reminder emails, after a one-day interval, then a two-day interval, then a four-day interval, and so on for each type of disk problem detected. Each interval is twice as long as the previous interval.
    • test: sends a single test email immediately upon smartd startup.
    • exec PATH: runs the executable PATH instead of the default mail command. PATH must point to an executable binary file or script. This allows to specify a desired action (beep the console, shutdown the system, and so on) when a problem is detected.
Save the changes and restart smartd.

Thursday, October 2, 2014

Red Hat Storage Server 3 : Highlight

  • Increased scale and capacity by more than three times with support for up to 60 drives per server, up from 36, and 128 servers per cluster, up from 64, providing a usable capacity of up to 19 petabytes per cluster.
  • Improved data protection and operational control of storage clusters, including:volume snapshots for point-in-time copy of critical data, and comprehensive monitoring of the storage cluster using open, industry standard frameworks, such as Nagios and SNMP.
  • Easy integration with emerging big data analytics environments with support for a Hadoop File System Plug-In that enables running ApacheTM Hadoop® workloads on the storage server, as well as tight integration with Apache Ambari for management and monitoring of Hadoop and underlying storage.
  • More hardware choice and flexibility, including support for SSD for low latency workloads, and a significantly expanded hardware compatibility list (HCL) for greater choice in hardware platforms.
  • Rapid deployment with RPM-based distribution option offering maximum deployment flexibility to existing Red Hat Enterprise Linux users. Customers can now easily add Red Hat Storage Server to existing pre-installed Red Hat Enterprise Linux deployments.

Wednesday, September 17, 2014

Windows 2012 : Monitoring Work Folders with PowerShell

Monitoring Work Folders with PowerShell

The Work Folders Service on Windows Server 2012 R2 comes with a supporting PowerShell module and cmdlets. (For the full list of Work Folders Cmdlets run gcm –m SyncShare in a Powershell console).
Just like in the examples shown above, where Server Manager was used to monitor and extract the information, the Work Folders cmdlets provide a way to retrieve Work Folders sync shares and users information. This can be either used by administrators for interactive monitoring session or for automation within PowerShell scripts.
Here are a few Powershell examples that provides Work Folders sync shares and users status information.
Get-SyncShare  - The Get-SyncShare cmdlet provides information on sync shares. This includes the file system location, the list of security groups and more.

From these objects, Staging folder and Path can be extracted and checked for availability and overall health.


Get-SyncUserStatus - similar to the users’ property window described above in the server manager section, this cmdlet provides Work Folders users’ information. This includes the user name, the devices that the users are using, last successful connections and more.  Running this cmdlet requires providing the specific user name and sync share.

Here is an example for listing the devices and status that Sally is using with Work Folders:

 In the results shown above, useful user information is shown about the user’s devices, their OS configuration and last successful sync time.

Get-Service - The Sync Share service (named SyncShareSVC ) status can be read by using PowerShell’s generic get-service command

 In the above example we can see that the service is in “Running” state. “Stopped” means that the service is not running.
Events – Powershell also provides an easy way of listing Work Folders events, either the operational or the reporting channels. Here are a few examples:
1) Listing Errors from the operational channel (in this example, the issues are reported on a system where one of the disks hosting the Work Folders directory was intentionally yanked out)

2) List successful events from the Work Folders Reporting channel

Thursday, September 4, 2014

New updated ScreenOS Signing Key, Boot Loader and ScreenOS images

Alert Description:

Juniper Networks has identified a potential exposure of the digital key used to sign NetScreen devices that run ScreenOS software images. While there is no evidence of a compromise, Juniper has taken proactive steps to revoke the old signing key and move to a new signing key for all NetScreen devices that run ScreenOS software. This measure applies only to NetScreen devices that run ScreenOS software, and does not apply to any other Juniper products.
Solution:
Customers who have installed any upgrades or patches to their ScreenOS products since 1 June 2014 are being advised to install the new signing key, ScreenOS and Boot Loader (when applicable) immediately; this will confirm the authenticity of the upgrades or patches completed since 1 June 2014. All customers will need to install these components to support future upgrades or patches to their ScreenOS products.


Customers are being asked to review the TSB16495 carefully and follow instructions for installing the new signing key, as necessary.

Monday, August 11, 2014

RHEL Brings Software Defined Storage to Big Data

cache tier diagram
Cache tiering divides the data cluster so that hot data being accessed regularly can be held on faster storage, typically SSD's, while erasure-coded cold data sits below on cheaper storage media. Image credit: Ceph.
Red Hat last month released the latest version of Inktank Ceph Enterprise, their object and block storage product based on the upstream open source Ceph project. It's notable not only as the first release since Red Hat acquired the two-year-old startup, Inktank, in April, but also for two key features that help open up a

new market for Ceph.


While Ceph gained prominence as the open source software-defined storage tool commonly used on the back end of OpenStack deployments, it's not strictly software for the cloud. With the latest new enterprise feature addition, Ceph has begun to see adoption among a new class of users interested in software-defined storage for big data applications.
The new enterprise features can be used in both legacy systems and in a cloud context, “but there's almost a third category of object storage within an enterprise,” said Sage Weil, Ceph project leader, in an interview at OSCON. “They're realizing that instead of buying expensive systems to store all of this data that's relatively cold, they can use software-defined open platforms to do that.”


Inktank Ceph Enterprise logo


“It's sort of cloudy in the sense that it's scale out,” Weil said, “but it's not really related to compute; it's just storage.”

Two Important New Features

Ceph Enterprise 1.2 contains erasure coding and cache-tiering, two features first introduced in the May release of Ceph Firefly 0.8. Erasure coding can pack more data into the same amount of space and requires less hardware than traditional replicated storage clusters, providing a cost savings benefit to companies that need to keep a lot of archival data around. Cache tiering divides the data cluster so that hot data being accessed regularly can be held on faster storage, typically SSD's, while erasure-coded cold data sits below on cheaper storage media.
Used together, erasure coding and cache tiering allow companies to combine the value of storing relatively cold, unused data in large quantities, with faster performance – all in the same cluster, said Ross Turk, director of product marketing for storage and big data at Red Hat.
It's a set of features that are both useful in a cloud platform context as well as in standalone storage for companies that want to benefit from the scale-out capabilities that the cloud has to offer but aren't entirely ready to move to the cloud.
“In theory it's great to have elastic resources and move it all to the cloud, but training organizations to adapt to that new paradigm and have their own ops teams able to run it, takes time,” Weil said.

Appealing to big data users

OpenStack was a good first use case for Ceph to target because developers and system administrators on those projects understand distributed software, Weil said. Similarly, a greenfield private cloud deployment is a good use case for Ceph because it's easy to stand up a new storage system at the same time “rather than attack legacy use cases head on,” he said.
But enterprise private and hybrid cloud adoption still lags behind public cloud use, according to two recent reports by IDC and Technology Business Research. One reason is that most companies lack the internal IT resources and expertise to move a significant portion of their resources to the cloud, according to a March 2014 enterprise cloud adoption study by Everest Group.
Storage faces an even longer road to adoption than the cloud, given the high standards and premium that companies place on retaining data and keeping it secure.
“People require their storage to be a certain level of quality and stability – you can reboot a server but not a broken disk and get your data back,” Turk said.
By providing an economic advantage to users in the growing cold storage market, Ceph has the added benefit of encouraging enterprise adoption of open source storage in the short term without relying on cloud adoption to fuel it.

The path to the open source data center

Over the long term, cloud computing and the software-defined data center – including storage, compute, and networking – will become the new paradigm for the enterprise, Weil said. And Ceph, already a dominant open source project in this space, will rise along with it.
“A couple of decades ago you had a huge transformation with Linux going from proprietary Unix OSes sold in conjunction with expensive hardware to what we have today in which you can run Linux or BSD or whatever on a huge range of hardware,” Weil said. “I think you'll see the same thing happen in storage, but that battle is just starting to happen.”
Red Hat's acquisition of Inktank will help shepherd Ceph along that path to widespread enterprise adoption -- starting with this first Ceph Enterprise release. Ceph will also eventually integrate with a lot of the other projects Red Hat is involved with, Weil says, including the Linux kernel, provisioning tools, and OpenStack itself.