Installing Smartmontools
Installation of smartmontools is straightforward as it available in base repositories of most Linux distros.Red Hat-based distributions:
# yum install smartmontools
Checking Hard Drive Health with Smartctl
First off, list the hard drives connected to your system with the following command:
# ls -l /dev | grep -E 'sd|hd'
The output should be similar to: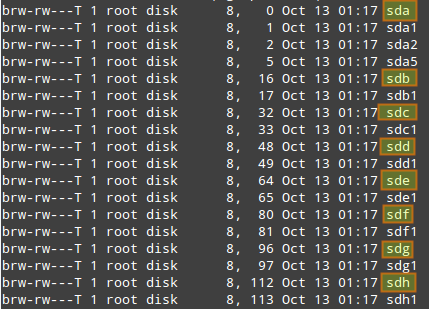
where sdx indicate device names assigned to the hard drives installed on your machine.
To display information about a particular hard disk (e.g., device model, S/N, firmware version, size, ATA version/revision, availability and status of SMART capability), run smartctl with "--info" flag, and specify the hard drive's device name as follows.
In this example, we will choose /dev/sda.
# smartctl --info /dev/sda

Although the ATA version information may seem to go unnoticed at first, it is one of the most important factors when looking for a replacement part. Each ATA version is backward compatible with the previous versions. For example, older ATA-1 or ATA-2 devices work fine on ATA-6 and ATA-7 interfaces, but unfortunately, that is not true for the other way around. In cases where the device version and interface version don't match, they work together at the capabilities of the lesser of the two. That being said, an ATA-7 hard drive is the safest choice for a replacement part in this case.
You can examine the health status of a particular hard drive with:
# smartctl -s on -a /dev/sda
In this command, "-s on" flag enables SMART on the specified device.
You can ommit it if SMART support is already enabled for /dev/sda.The SMART information for a disk consists of several sections. Among other things, "READ SMART DATA" section shows the overall health status of the drive.
=== START OF READ SMART DATA SECTION ===
SMART overall-health self-assessment rest result: PASSED
The result of this test can be either PASSED or FAILED. In the latter case, a hardware failure is imminent, so you may want to start backing up your important data from that drive!
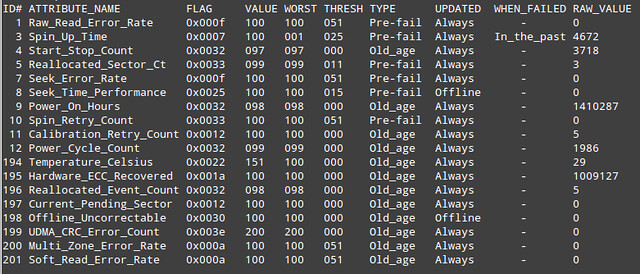
Basically, SMART attribute table lists values of a number of attributes defined for a particular drive by its manufacturer, as well as failure threshold for these attributes. This table is automatically populated and updated by drive firmware.
- ID#: attribute ID, usually a decimal (or hex) number between 1 and 255.
- ATTRIBUTE_NAME: attribute names defined by a drive manufacturer.
- FLAG: attribute handling flag (we can ignore it).
- VALUE: this is one of the most important information in the table, indicating a "normalized" value of a given attribute, whose range is between 1 and 253. 253 means the best condition, while 1 means the worse condition. Depending on attributes and manufacturers, an initial VALUE can be set to either 100 or 200.
- WORST: the lowest VALUE ever recorded.
- THRESH: the lowest value that WORST should ever be allowed to fall to, before reporting a given hard drive as FAILED.
- TYPE: the type of attribute (either Pre-fail or Old_age). A Pre-fail attribute is considered a critical attribute; one that participates in the overall SMART health assessment (PASSED/FAILED) of the drive. If any Pre-fail attribute fails, then the drive is considered "about to fail." On the other hand, an Old_age attribute is considered (for SMART purposes) a non-critical attribute (e.g., normal wear and tear); one that does not fail the drive per se.
- UPDATED: indicates how often an attribute is updated. Offline represents the case when offline tests are being performed on the drive.
- WHEN_FAILED: this will be set to "FAILING_NOW" (if VALUE is less than or equal to THRESH), or "In_the_past" (if WORST is less than equal to THRESH), or "-" (if none of the above). In case of "FAILING_NOW", back up your important files ASAP, especially if the attribute is of TYPE Pre-fail. "In_the_past" means that the attribute has failed before, but that it's OK at the time of running the test. "-" indicates that this attribute has never failed.
- RAW_VALUE: a manufacturer-defined raw value, from which VALUE is derived.
Fortunately, the answer is yes. And that's when smartd comes in.
Configuring Smartctl and Smartd for Live Monitoring
First, edit smartctl's configuration file (/etc/default/smartmontools) to tell it to start smartd at system startup, and to specify check intervals in seconds (e.g., 7200 = 2 hours).start_smartd=yes smartd_opts="--interval=7200"Next, edit smartd's configuration file (/etc/smartd.conf) to add the followign line.
/dev/sda -m myemail@mydomain.com -M test
- -m <email-address>: specifies an email address to send test reports to. This can be a system user such as root, or an email address such as myemail@mydomain.com if the server is configured to relay emails to the outside of your system.
- -M <delivery-type>: specifies the desired type of delivery for an email report.
- once: sends only one warning email for each type of disk problem detected.
- daily: sends additional warning reminder emails, once per day, for each type of disk problem detected.
- diminishing: sends additional warning reminder emails, after a one-day interval, then a two-day interval, then a four-day interval, and so on for each type of disk problem detected. Each interval is twice as long as the previous interval.
- test: sends a single test email immediately upon smartd startup.
- exec PATH: runs the executable PATH instead of the default mail command. PATH must point to an executable binary file or script. This allows to specify a desired action (beep the console, shutdown the system, and so on) when a problem is detected.