Nuffnang

Friday, May 23, 2014

Basic IP Tables


iptables is a simple firewall installed on most linux distributions. The linux manual page for iptables says it is an administration tool for IPv4 packet filtering and NAT, which, in translation, means it is a tool to filter out and block Internet traffic. iptables firewall is included by default in Centos 6.4 linux images provided by DigitalOcean.

We will set up firewall one by one rule. To simplify: a firewall is a list of rules, so when an incomming connection is open, if it matches any of the rules, this rule can accept that connection or reject it. If no rules are met, we use the default rule.

Decide which ports and services to open


To start with, we want to know what services we want to open to public. Let's use the typical web-hosting server: it is a web and email server, and we also need to let ourselves in by SSH server.

First, we want to leave SSH port open so we can connect to the VPS remotely: that is port 22. Also, we need port 80 and 443 (SSL port) for web traffic. For sending email, we will open port 25 (regular SMTP) and 465 (secure SMTP). To let users receive email, we will open the usual port 110 (POP3) and 995 (secure POP3 port). Additionally, we'll open IMAP ports, if we have it installed: 143 for IMAP, and 993 for IMAP over SSL.

Note: It is recommended to only allow secure protocols, but that may not be an option, if we cannot influence the mail service users to change their email clients.

Block the most common attacks


DigitalOcean VPSs usually come with the empty configuration: all traffic is allowed. Just to make sure of this, we can flush the firewall rules - that is, erase them all:
iptables -F

We can then add a few simple firewall rules to block the most common attacks, to protect our VPS from script-kiddies. We can't really count on iptables alone to protect us from a full-scale DDOS or similar, but we can at least put off the usual network scanning bots that will eventually find our VPS and start looking for security holes to exploit. First, we start with blocking null packets.
iptables -A INPUT -p tcp --tcp-flags ALL NONE -j DROP

We told the firewall to take all incoming packets with tcp flags NONE and just DROP them. Null packets are, simply said, recon packets. The attack patterns use these to try and see how we configured the VPS and find out weaknesses. The next pattern to reject is a syn-flood attack.
iptables -A INPUT -p tcp ! --syn -m state --state NEW -j DROP

Syn-flood attack means that the attackers open a new connection, but do not state what they want (ie. SYN, ACK, whatever). They just want to take up our servers' resources. We won't accept such packages. Now we move on to one more common pattern: XMAS packets, also a recon packet.
iptables -A INPUT -p tcp --tcp-flags ALL ALL -j DROP

We have ruled out at least some of the usual patterns that find vulnerabilities in our VPS.

Open up ports for selected services


Now we can start adding selected services to our firewall filter. The first such thing is a localhost interface:
iptables -A INPUT -i lo -j ACCEPT

We tell iptables to add (-A) a rule to the incoming (INPUT) filter table any trafic that comes to localhost interface (-i lo) and to accept (-j ACCEPT) it. Localhost is often used for, ie. your website or email server communicating with a database locally installed. That way our VPS can use the database, but the database is closed to exploits from the internet.
Now we can allow web server traffic:
iptables -A INPUT -p tcp -m tcp --dport 80 -j ACCEPT
iptables -A INPUT -p tcp -m tcp --dport 443 -j ACCEPT

We added the two ports (http port 80, and https port 443) to the ACCEPT chain - allowing traffic in on those ports. Now, let's allow users use our SMTP servers:
iptables -A INPUT -p tcp -m tcp --dport 25 -j ACCEPT
iptables -A INPUT -p tcp -m tcp --dport 465 -j ACCEPT

Like stated before, if we can influence our users, we should rather use the secure version, but often we can't dictate the terms and the clients will connect using port 25, which is much more easier to have passwords sniffed from. We now proceed to allow the users read email on their server:
iptables -A INPUT -p tcp -m tcp --dport 110 -j ACCEPT
iptables -A INPUT -p tcp -m tcp --dport 995 -j ACCEPT

Those two rules will allow POP3 traffic. Again, we could increase security of our email server by just using the secure version of the service. Now we also need to allow IMAP mail protocol:
iptables -A INPUT -p tcp -m tcp --dport 143 -j ACCEPT
iptables -A INPUT -p tcp -m tcp --dport 993 -j ACCEPT

Limiting SSH access

We should also allow SSH traffic, so we can connect to the VPS remotely. The simple way to do it would be with this command:
iptables -A INPUT -p tcp -m tcp --dport 22 -j ACCEPT

We now told iptables to add a rule for accepting tcp traffic incomming to port 22 (the default SSH port). It is advised to change the SSH configuration to a different port, and this firewall filter should be changed accordingly, but configuring SSH is not a part of this article. However, we could do one more thing about that with firewall itself. If our office has a permanent IP address, we could only allow connections to SSH from this source. This would allow only people from our location to connect. First, find out your outside IP address. Make sure it is not an address from your LAN, or it will not work. You could do that simply by visiting the whatismyip.com site. Another way to find it out is to type:
w

in the terminal, we should see us logged in (if we're the only one logged in' and our IP address written down. The output looks something like this:
root@iptables# w
 11:42:59 up 60 days, 11:21,  1 user,  load average: 0.00, 0.00, 0.00
USER     TTY      FROM              LOGIN@   IDLE   JCPU   PCPU WHAT
root   pts/0    213.191.xxx.xxx  09:27    0.00s  0.05s  0.00s w

Now, you can create the firewall rule to only allow traffic to SSH port if it comes from one source: your IP address:
iptables -A INPUT -p tcp -s YOUR_IP_ADDRESS -m tcp --dport 22 -j ACCEPT

Replace YOUR_IP_ADDRESS with the actuall IP, of course.

We could open more ports on our firewall as needed by changing the port numbers. That way our firewall will allow access only to services we want. Right now, we need to add one more rule that will allow us to use outgoing connections (ie. ping from VPS or run software updates);
iptables -I INPUT -m state --state ESTABLISHED,RELATED -j ACCEPT

It will allow any established outgoing connections to receive replies from the VPS on the other side of that connection. When we have it all set up, we will block everything else, and allow all outgoing connections.
iptables -P OUTPUT ACCEPT
iptables -P INPUT DROP

Now we have our firewall rules in place.

Save the configuration


Now that we have all the configuration in, we can list the rules to see if anything is missing.
iptables -L -n

The -n switch here is because we need only ip addresses, not domain names. Ie. if there is an IP in the rules like this: 69.55.48.33: the firewall would go look it up and see that it was a digitalocean.com IP. We don't need that, just the address itself. Now we can finally save our firewall configuration:
iptables-save | sudo tee /etc/sysconfig/iptables

The iptables configuration file on CentOS is located at /etc/sysconfig/iptables. The above command saved the rules we created into that file. Just to make sure everything works, we can restart the firewall:
service iptables restart

The saved rules will persist even when the VPS is rebooted.


Once connected, we log in as root and issue the following command:
iptables -F

This will flush the filters, we'll be able to get in the VPS again.

Conclusion

This article is not exhaustive, and it only scratched the surface of running a simple firewall on a linux machine. It will do enough for a typical web and email server scenario for a developer not familiar with linux command line or iptables.

Friday, May 9, 2014

Windows Azure Pack for Windows Server

Windows Azure Pack for Windows Server is a collection of Windows Azure technologies, available to Microsoft customers at no additional cost for installation into your data center. It runs on top of Windows Server 2012 R2 and System Center 2012 R2 and, through the use of the Windows Azure technologies, enables you to offer a rich, self-service, multi-tenant cloud, consistent with the public Windows Azure experience.
Windows Azure Pack includes the following capabilities:
  • Management portal for tenants – a customizable self-service portal for provisioning, monitoring, and managing services such as Web Site Clouds, Virtual Machine Clouds, and Service Bus Clouds.
  • Management portal for administrators – a portal for administrators to configure and manage resource clouds, user accounts, and tenant offers, quotas, and pricing.
  • Service management API – a REST API that helps enable a range of integration scenarios including custom portal and billing systems.
  • Web Site Clouds – a service that helps provide a high-density, scalable shared web hosting platform for ASP.NET, PHP, and Node.js web applications. The Web Site Clouds service includes a customizable web application gallery of open source web applications and integration with source control systems for custom-developed web sites and applications.
  • Virtual Machine Clouds – a service that provides infrastructure-as-a-service (IaaS) capabilities for Windows and Linux virtual machines. The Virtual Machine Clouds service includes a VM template gallery, scaling options, and virtual networking capabilities.
  • Service Bus Clouds – a service that provides reliable messaging services between distributed applications. The Service Bus Clouds service includes queued and topic-based publish/subscribe capabilities.
  • SQL and MySQL – services that provide database instances. These databases can be used in conjunction with the Web Sites service.
  • Automation – the capability to automate and integrate additional custom services into the services framework, including a runbook editor and execution environment.

Monday, May 5, 2014

GlusterFS 3.5 Unveiled


We are pleased to announce that GlusterFS 3.5 is now available. The latest release includes several long-awaited features such as improved logging, file snapshotting, on-wire compression, and at-rest encryption.

You can download GlusterFS 3.5 now.

What’s New?

There’s a lot to like in the new release. Here’s a preview of what GlusterFS 3.5 includes:
  • AFR_CLI_enhancements: Improved logging with more clarity and statistical information. Additional clarity in logging has been on the wish list for the Gluster community for some time. This improvement addresses eight different bugzilla issues in one fell swoop. It allows visibility into why a self-heal process was initiated and which files are affected, for example. Prior to this enhancement, clearly identifying split-brain issues from the logs was often difficult for an end user or administrator, and there was no facility to identify which files were affected by a split brain issue automatically. Remediating split brain without quorum will still require some manual effort, but with the tools provided this will become much simpler.
  • Exposing Volume Capabilities: Provides client-side insight into whether a volume is using the BD translator and, if so, which capabilities are being utilized.
  • File Snapshot: Provides a mechanism for snapshotting individual files. One of the more anticipated features of the 3.5 release, this precedes the upcoming ability to snapshot entire volumes. The most prevalent use case for this feature will be to snapshot running VMs, allowing for point-in-time capture. This also allows a mechanism to revert VMs to a previous state directly from Gluster, without needing to use external tools.
  • GFID Access: A new method for accessing data directly by GFID. With this method, we can consume the data in changelog translator, which is logging ‘gfid’ internally, very efficiently. This feature yet again extends the methods by which you can access Gluster, and should be well-received by members of the developer community, who will have a simple way to perform file operations programmatically within a Gluster volume.
  • On-Wire Compression + Decompression: Use of this feature reduces the overall network overhead for Gluster operations from a client. Depending on workload, this could show dramatic increases in the performance of Gluster volumes. This feature also allows a good trade-off of CPU to network resources, which will be a boon to most users as CPU is not generally being consumed to anywhere near its full potential, whereas network has traditionally been the bottleneck in high performance workloads.
  • Prevent NFS restart on Volume change (Part 1): Previously, any volume change (volume option, volume start, volume stop, volume delete, brick add, etc.) would restart the NFS server, which led to service disruptions.This feature allow modifying certain NFS-based volume options without such interruptions occurring. Part 1 is anything not requiring a graph change.
  • Quota Scalability: Massively increase the amount of quota configurations from a few hundred to 65536 per volume.
  • readdir_ahead: Gluster now provides read-ahead support for directories to improve sequential directory read performance.
  • zerofill: Enhancement to allow zeroing out of VM disk images, which is useful in first time provisioning or for overwriting an existing disk.
  • Brick Failure Detection: Detecting failures on the filesystem that a brick uses makes it possible to handle errors that are caused from outside of the Gluster environment.
  • Disk encryption: Implement the previous work done in HekaFS into Gluster. This allows a volume (or per-tenant part of a volume) to be encrypted “at rest” on the server using keys only available on the client. [Note: We encrypt only content of regular files. File names are not encrypted! Also, encryption does not work in NFS mounts.]
  • Geo-Replication Enhancement: A massive rewrite of the existing geo-replication architecture, this set of enhancements brings geo-replication to an entirely new level. Previously, the geo-replication process, gsyncd, was a single point of failure as it only ran on one node in the cluster. If the node running gsyncd failed, the entire geo-replication process was offline until the issue was addressed. The original geo-rep was a vast improvement over plain rsync checksumming and made intelligent use of xattrs to identify a reduced list of candidates for block- or file-level copy, massively improving on full directory crawls performed by rsync. In this latest incarnation, the improvement is extended even further by foregoing use of xattrs to identify change candidates and directly consuming from the changelog, which will improve performance twofold: one, by keeping a running list of only those files that may need to be synced; and two, the changelog is maintained in memory, which will allow near instant access to which data needs to be changed and where by the gsync daemon.

Tuesday, April 1, 2014

Red Hat releases beta of Enterprise Virtualization version 3.4

Red Hat has released a beta for an upcoming release of Red Hat Enterprise Virtualization (RHEV) platform version 3.4. Red Hat Enterprise Virtualization (RHEV) is Red Hats virtualization platform based on the Kernel-based Virtual Machine (KVM) hypervisor.
Red Hat Enterprise Virtualization 3.4 Beta is available immediately to existing Red Hat Enterprise Virtualization customers.
New features in Red Hat Enterprise Virtualization 3.4 Beta include:
  • Stronger OpenStack integration
    • Security and scalability improvements of Neutron provisioned networks
    • Support for open vSwitch and its SDN capabilities
  • Enterprise network capabilities enhancements
    • Multi-host network configuration capabilities
  • Enterprise storage capabilties enhancements
    • Mixed storage domains
    • Single disk snapshots
  • Advanced manageability of the entire stack
    • Additional scheduler enhancements
    • Affinity/Anti-Affinity groups
    • Hot Plug CPU
    • SNMP configuration service
    • Persistent cloud-init metadata

Monday, March 24, 2014

Mozilla New CEO

The Mozilla Board of Directors has announced that co-founder and current Chief Technology Officer Brendan Eich will be appointed to the role of CEO of Mozilla, effective immediately.
Li Gong will be named Chief Operating Officer and a number of functions will move under his organization including Cloud Services, IT, Marketplace, Mobile & Research, and Platform Engineering.

Mitchell Baker will remain Mozilla Executive Chairwoman and will continue the long and successful partnership with Brendan as co-founders who lead the Mozilla project to fulfill our mission to promote openness, innovation and opportunity on the Web.

Jay Sullivan, our acting CEO during the executive search, has led Mozilla passionately and will leave a lasting impact on the project.  Under Jay’s leadership Mozilla has delivered a number of key products, including several versions of the Firefox Web browser and the very successful launches of Firefox OS. After six years at Mozilla, Jay will stay on through the transition to support the team and then leave to pursue new opportunities.

Brendan Eich, Mozilla co-founder, has been deeply involved in every aspect of Mozilla’s development starting from the original idea in 1998. He has deep expertise in both the technical and product sides of the organization, as well as the Web in general. His technology vision and general acumen have quietly shaped not only Mozilla, but large parts of the Web over the past two decades. He is the creator of JavaScript, a key technology of the Web.  Brendan brings Mozilla’s founding vision and boldness to our current initiatives.  These traits are a unique asset as Mozilla brings openness and choice through new initiative such as Firefox OS and cloud services.  Brendan and Mitchell’s fifteen-year history of co-founding Mozilla and working together is an asset in this time of necessary organizational and community growth.

“Mozilla speaks for the open Web, where consumers and developers alike can prosper and express themselves free from the constraints imposed by commercial, profit-driven technologies. Mozilla’s organization and Firefox products help keep the Web balanced to every individual’s interests, and not just for the highest profit”, stated Reid Hoffman, Mozilla Board Member. “Brendan Eich, as a founder and a well-respected innovator of Web technologies, is uniquely equipped to lead Mozilla with his deep understanding of the organization’s core values and technology vision.”
Mozilla is unique in how we operate, because every Mozilla contributor and user around the world is an important part of driving our mission forward, reaching our goals and, ultimately, shaping the future direction of the Web.

Mozilla has delivered significant accomplishments across the project, including the upcoming major release of Firefox that will include new user experience enhancements, and Firefox Accounts which provides easier syncing and other benefits; Mozilla partnering with Unity Technologies and with Epic Games to provide developers with tools for delivering superior games on the web without plugins; Firefox OS devices launched in 15 countries with 4 operators and 4 device manufacturers, capped-off by another amazing industry reception for Mozilla and Firefox OS at Mobile World Congress 2014, the world’s largest mobile industry trade show.

Tuesday, March 11, 2014

GlusterFS (File System) setup at RHEL/CentOS and Fedora

Distributed computing systems offer a wide array of advantages over centralized computing systems. Here data is stored in a distributed way with several nodes as servers.
GlusterFS Storage
GlusterFS Storage
The concept of a metadata server is no longer needed in a distributed file system. In distributed file systems, it offers a common view point of all the files separated among different servers. Files/directories on these storage servers are accessed in normal ways.
For example, the permissions for files/directories can be set as in usual system permission model, i.e. the owner, group and others. The access to the file system basically depends on how the particular protocol is designed to work on the same.

What is GlusterFS?

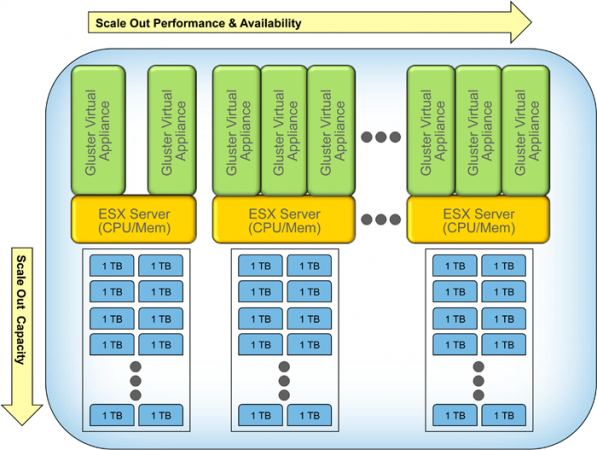
GlusterFS is a distributed file system defined to be used in user space, i.e. File System in User Space (FUSE). It is a software based file system which accounts to its own flexibility feature.
Look at the following figure which schematically represents the position of GlusterFS in a hierarchical model. By default TCP protocol will be used by GlusterFS.
GlusterFS Design
GlusterFS Design

Advantages to GlusterFS

  1. Innovation – It eliminates the metadata and can dramtically improve the performance which will help us to unify data and objects.
  2. Elasticity – Adapted to growth and reduction of size of the data.
  3. Scale Linearly – It has availability to petabytes and beyond.
  4. Simplicity – It is easy to manage and independent from kernel while running in user space.

What makes Gluster outstanding among other distributed file systems?

  1. Salable – Absence of a metadata server provides a faster file system.
  2. Affordable – It deploys on commodity hardware.
  3. Flexible – As I said earlier, GlusterFS is a software only file system. Here data is stored on native file systems like ext4, xfs etc.
  4. Open Source – Currently GlusterFS is maintained by Red Hat Inc, a billion dollar open source company, as part of Red Hat Storage.

Storage concepts in GlusterFS

  1. Brick – Brick is basically any directory that is meant to be shared among the trusted storage pool.
  2. Trusted Storage Pool – is a collection of these shared files/directories, which are based on the designed protocol.
  3. Block Storage – They are devices through which the data is being moved across systems in the form of blocks.
  4. Cluster – In Red Hat Storage, both cluster and trusted storage pool convey the same meaning of collaboration of storage servers based on a defined protocol.
  5. Distributed File System – A file system in which data is spread over different nodes where users can access the file without knowing the actual location of the file. User doesn’t experience the feel of remote access.
  6. FUSE – It is a loadable kernel module which allows users to create file systems above kernel without involving any of the kernel code.
  7. glusterd – glusterd is the GlusterFS management daemon which is the backbone of file system which will be running throughout the whole time whenever the servers are in active state.
  8. POSIX – Portable Operating System Interface (POSIX) is the family of standards defined by the IEEE as a solution to the compatibility between Unix-variants in the form of an Application Programmable Interface (API).
  9. RAID – Redundant Array of Independent Disks (RAID) is a technology that gives increased storage reliability through redundancy.
  10. Subvolume – A brick after being processed by least at one translator.
  11. Translator – A translator is that piece of code which performs the basic actions initiated by the user from the mount point. It connects one or more sub volumes.
  12. Volume – A volumes is a logical collection of bricks. All the operations are based on the different types of volumes created by the user.
Different Types of Volumes
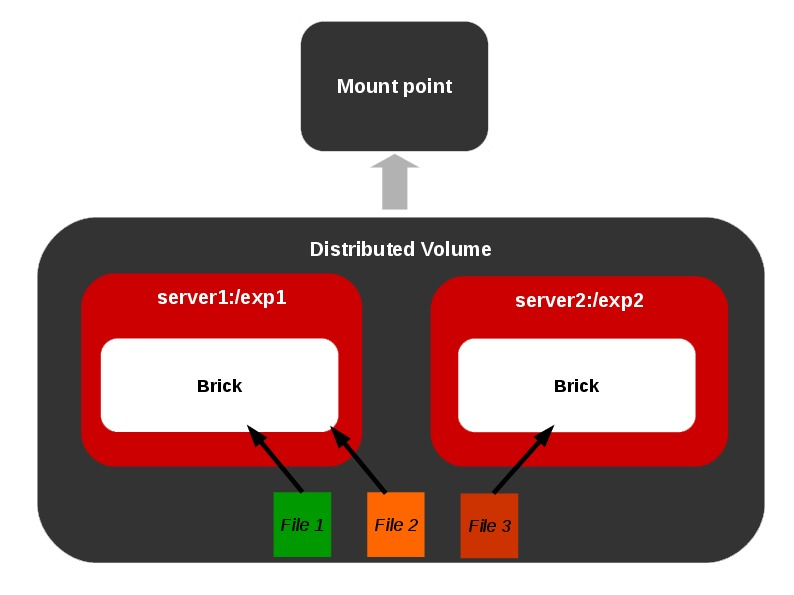
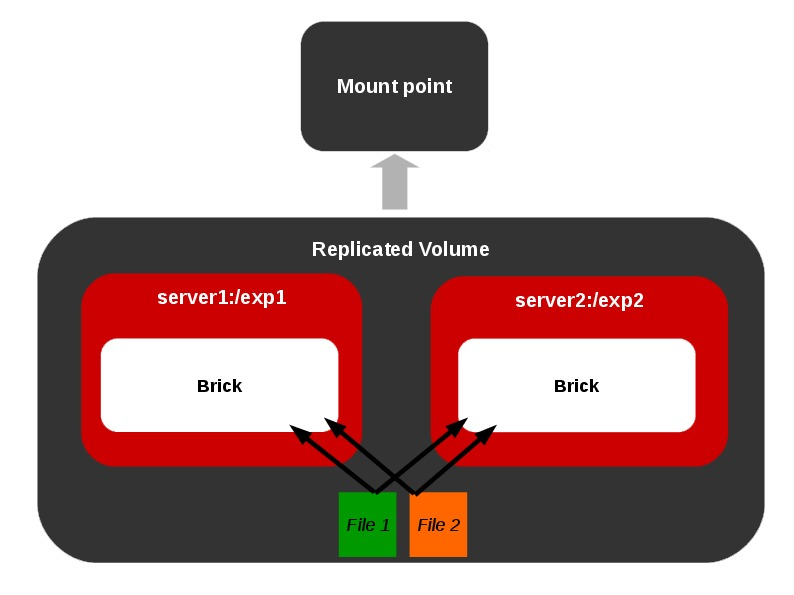
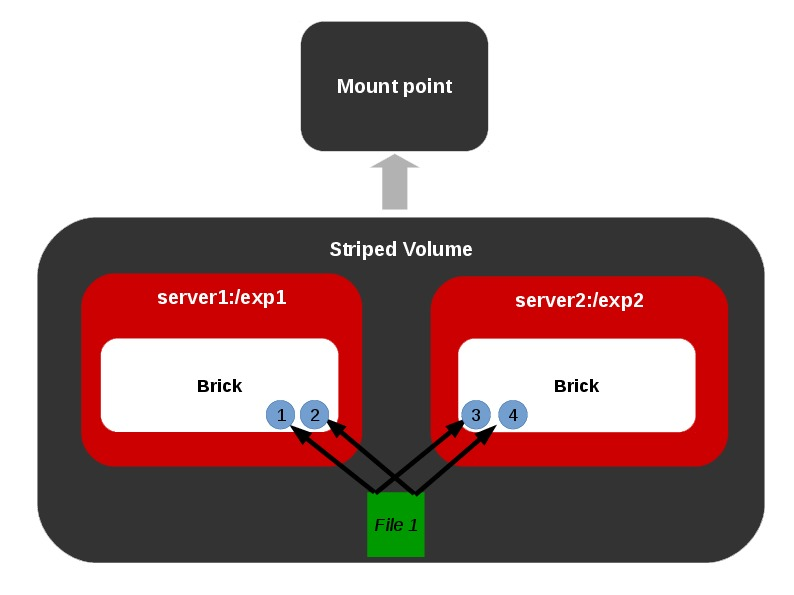
Representations of different types of volumes and combinations among these basic volume types are also allowed as shown below.
Distributed Volume
Distributed Volume
Replicated Volume
Replicated Volume
Striped Volume
Striped Volume
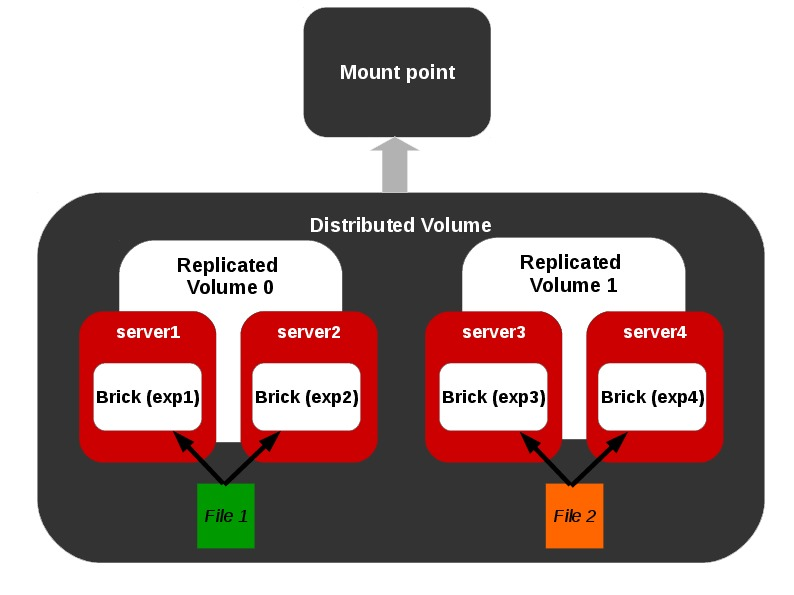
Distributed Replicated Volume
Representation of a distributed-replicated volume.
Distributed Replicated Volume

Installation of GlusterFS in RHEL/CentOS and Fedora

In this article, we will be installing and configuring GlusterFS for the first time for high availability of storage. For this, we’re taking two servers to create volumes and replicate data between them.

Step :1 Have at least two nodes

  1. Install CentOS 6.5 (or any other OS) on two nodes.
  2. Set hostnames named “server1” and “server2“.
  3. A working network connection.
  4. Storage disk on both nodes named “/data/brick“.

Step 2: Enable EPEL and GlusterFS Repository

Before Installing GlusterFS on both the servers, we need to enable EPEL and GlusterFS repositories in order to satisfy external dependencies. Use the following link to install and enable epel repository under both the systems.
  1. How to Enable EPEL Repository in RHEL/CentOS
Next, we need to enable GlusterFs repository on both servers.
# wget -P /etc/yum.repos.d http://download.gluster.org/pub/gluster/glusterfs/LATEST/EPEL.repo/glusterfs-epel.repo

Step 3: Installing GlusterFS

Install the software on both servers.
# yum install glusterfs-server
Start the GlusterFS management daemon.
# service glusterd start
Now check the status of daemon.
# service glusterd status
Sample Output
service glusterd start
  service glusterd status
  glusterd.service - LSB: glusterfs server
      Loaded: loaded (/etc/rc.d/init.d/glusterd)
     Active: active (running) since Mon, 13 Aug 2012 13:02:11 -0700; 2s ago
    Process: 19254 ExecStart=/etc/rc.d/init.d/glusterd start (code=exited, status=0/SUCCESS)
     CGroup: name=systemd:/system/glusterd.service
      ├ 19260 /usr/sbin/glusterd -p /run/glusterd.pid
      ├ 19304 /usr/sbin/glusterfsd --xlator-option georep-server.listen-port=24009 -s localhost...
      └ 19309 /usr/sbin/glusterfs -f /var/lib/glusterd/nfs/nfs-server.vol -p /var/lib/glusterd/...

Step 4: Configure SELinux and iptables

Open ‘/etc/sysconfig/selinux‘ and change SELinux to either “permissive” or “disabled” mode on both the servers. Save and close the file.
# This file controls the state of SELinux on the system.
# SELINUX= can take one of these three values:
#     enforcing - SELinux security policy is enforced.
#     permissive - SELinux prints warnings instead of enforcing.
#     disabled - No SELinux policy is loaded.
SELINUX=disabled
# SELINUXTYPE= can take one of these two values:
#     targeted - Targeted processes are protected,
#     mls - Multi Level Security protection.
SELINUXTYPE=targeted
Next, flush the iptables in both nodes or need to allow access to the other node via iptables.
# iptables -F

Step 5: Configure the Trusted Pool

Run the following command on ‘Server1‘.
gluster peer probe server2
Run the following command on ‘Server2‘.
gluster peer probe server1
Note: Once this pool has been connected, only trusted users may probe new servers into this pool.

Step 6: Set up a GlusterFS Volume

On both server1 and server2.
# mkdir /data/brick/gv0
Create a volume On any single server and start the volume. Here, I’ve taken ‘Server1‘.
# gluster volume create gv0 replica 2 server1:/data/brick1/gv0 server2:/data/brick1/gv0
# gluster volume start gv0
Next, confirm the status of volume.
# gluster volume info
Note: If in-case volume is not started, the error messages are logged under ‘/var/log/glusterfs‘ on one or both the servers.

Step 7: Verify GlusterFS Volume

Mount the volume to a directory under ‘/mnt‘.
# mount -t glusterfs server1:/gv0 /mnt
Now you can create, edit files on the mount point as a single view of the file system.

Features of GlusterFS

  1. Self-heal – If any of the bricks in a replicated volume are down and users modify the files within the other brick, the automatic self-heal daemon will come into action as soon as the brick is up next time and the transactions occurred during the down time are synced accordingly.
  2. Rebalance – If we add a new brick to an existing volume, where large amount of data was previously residing, we can perform a rebalance operation to distribute the data among all the bricks including the newly added brick.
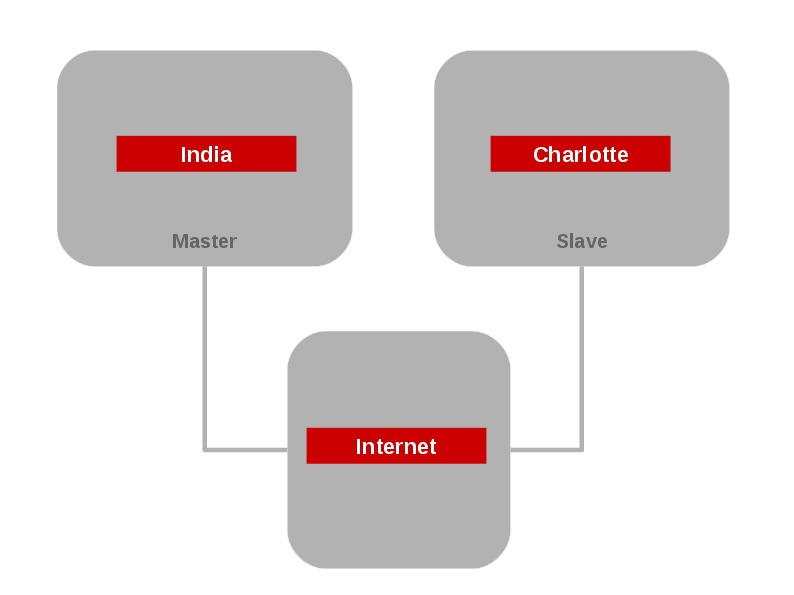
  3. Geo-replication – It provides back-ups of data for disaster recovery. Here comes the concept of master and slave volumes. So that if master is down whole of the data can be accessed via slave. This feature is used to sync data between geographically separated servers. Initializing a geo-replication session requires a series of gluster commands.
Here, is the following screen grab that shows the Geo-replication module.
Geo Replication
Geo Replication

Saturday, March 8, 2014

Mozilla Thunderbird

Thunderbird Features

Easy to Set Up and Easy to Use

Mail Account Setup Wizard

Mail Account Wizard screenshot All you need to provide is your name, email address, and password and the email account set up wizardry will check our database and find the email settings for you.

Personalized Email Addresses

Account Provisioner screenshot Ever dreamed of having a personalized email address (such as "dad@thesmithfamily.com") for you, your family or your business? Thunderbird makes this easy - you can sign up for a new email address within Thunderbird, and it will all be set up automatically for you ready to send and receive.

Improved Interface

We’re always looking for ways to make email easier.
Tabbed Email
Tabbed email lets you load emails in separate tabs so you can quickly jump between them. Tabs appear on the top of the menu bar providing a powerful visual experience and allowing the toolbars to be much more contextual. When quitting Thunderbird, visible tabs will be saved and will be restored when you open Thunderbird the next time.
Tabbed Email screenshot
Entering a new address in your address book
One-click Address Book is a quick and easy way to add people to your address book. Add people by simply clicking on the star icon in the message you receive. Two clicks and you can add more details like a photo, birthday, and other contact information.
One-click Address Book screenshot
Multiple Channel Chat
Enjoy real-time conversation with your contacts, right from your favorite messaging application, with multiple supported networks. Thunderbird makes it easy to search through both past conversations and received emails.
Chat Networks screenshot
Attachment Reminder
The attachment reminder looks for the word attachment (and other words like file types) in the body of your message and reminds you to add an attachment before hitting send.
Return to top

Customize Your Email Experience

Add-ons Manager screenshot

Add-ons Manager

Find and install add-ons directly in Thunderbird. You no longer need to visit the add-ons Web site - instead simply fire up the Add-ons Manager. Not sure which add-on is right for you? Ratings, recommendations, descriptions and pictures of the add-ons in action help you make your selection.

Large Files Management

You can speed up the transfer of large documents by uploading them to an online storage provider and sharing the link instead of sending the file directly as a message attachment. Improve the speed of sending email and avoid message rejection if the recipient's server disallows large files. As an added bonus, you'll also save space in your sent folder and the recipient's inbox.
Filelink screenshot

Thunderbird Look & Feel

Lightweight "skins" allow you to change the look and feel of Thunderbird in an instant. Hundreds of skins are available from the latest movies, famous landmarks, and Japanese tattoos. You can also choose from several Themes that dress up all the different icons in Thunderbird.

Smart Folders

Smart Folders help you manage multiple email accounts by combining special folders like your Inbox, Sent, or Archive folder. Instead of going to the Inbox for each of your mail accounts, you can see all of your incoming email in one Inbox folder.

Beyond Add-ons

Add-ons are the cornerstone of customization, but adapting Firefox to suit your style doesn’t stop there. You can add new search engines, change toolbar preferences, display different sizes, shapes and styles for your browser’s navigation buttons and more. With additional preferences, you can specify a Web mail client (such as Gmail) to open up when you click on an address from a Web page or set up a news reader application for the blogs you encounter.
Return to top

Multiple Search Options

Search the Web

Mail Account Wizard screenshot You can now search the Web without having to leave Thunderbird. Type whatever comes to mind in Thunderbird's search box and choose from several different search providers.
You can also highlight words in your email, right click, and select "search the web for:" to start your Web search.

Search Tools
The search interface in Thunderbird contains filtering and timeline tools to pinpoint the exact email you're looking for. Thunderbird also indexes all of your emails and chat conversations to help you search even faster. Your search results are displayed in a tab so you can easily switch back and forth to your search results and other email.
Tabbed Email screenshot
Quick Filter Toolbar
The Quick Filter Toolbar lets you filter your email faster. Start typing in words in the Quick Filter search box and the results are displayed instantly. Or you can filter your email by New Messages, Tags, and people in your Address Book. You can also "Pin" or save a Filter and use it across multiple folders.
One-click Address Book screenshot
Message Archive
If you think you're going to need an email in the future but want it out of your inbox without deleting it, archive it! Archiving helps you manage your inbox and put your email into the archive folder system.
Selecting the Archive button or hitting the 'A' key will archive your email.
Chat Networks screenshot 
 

Secure and Protect Your Mail

Cutting Out the Junk

Thunderbird's popular junk mail tools are updated to stay ahead of spam. Each email you receive passes through Thunderbird's leading-edge junk mail filters. Each time you mark messages as spam, Thunderbird "learns" and improves its filtering so you can spend more time reading the mail that matters. Thunderbird can also use your mail provider's spam filters to keep junk mail out of your inbox.

Robust Privacy and Do Not Track

Thunderbird offers support for user privacy and remote image protection. To ensure a user's privacy, Thunderbird automatically blocks remote images in email messages. Thunderbird also supports the Do Not Track option. This is associated with Search the Web, but can also be used in other requests for web pages enabled by add-ons.
Filelink screenshot

Phishing Protection

Thunderbird protects you from email scams which try to trick users into handing over personal and confidential information by indicating when a message is a potential phishing attempt. As a second line of defense, Thunderbird warns you when you click on a link which appears to be taking you to a different Web site than the one indicated by the URL in the message.
Tabbed Email screenshot

Activity Manager

The Activity Manager records all the interactions between Thunderbird and your email provider in one place. There's no more guess work. You only have to look in one place to see everything that's happening with your email.
Tabbed Email screenshot

Automated Update

Thunderbird's update system checks to see if you're running the latest version, and notifies you when a security update is available. These security updates are small (usually 200KB - 700KB), giving you only what you need and making the security update quick to download and install. The automated update system provides updates for Thunderbird on Windows, Mac OS X, and Linux in over 40 different languages.
Tabbed Email screenshot

Open Source

At the heart of Thunderbird is an open source development process driven by thousands of passionate, experienced developers and security experts spread all over the world. Our openness and active community of experts helps to ensure our products are more secure and quickly updated, while also enabling us to take advantage of the best third party security scanning and evaluation tools to further bolster overall security.